By Chef Ahmad | Cookdawn
🔥 That Sound Is Not Just Sizzle — It Is Science
There is a precise moment when everything changes. You place a cold, loosely packed ball of 80/20 ground chuck onto a cast iron surface sitting at 450°F / 232°C — and the sound that comes back at you is not gentle. It cracks. It pops. It hisses like something alive.
Most people hear that and think: good, it is cooking. What is actually happening is far more interesting than that. In those first four seconds of contact, you are not just cooking meat. You are triggering one of the most complex flavor-generating chemical events in all of food science — and if you do not understand it, you will keep producing gray, steamed, flavorless patties and wonder what went wrong.
I have made smash burgers well over two hundred times across different griddle surfaces, fat ratios, and bun types, adjusting one variable at a time to understand what actually drives that deeply golden, lacy, crackling crust. And I can tell you with absolute certainty: the difference between a great smash burger and a forgettable one is not the sauce. It is not even the cheese. It is the surface temperature, the smash timing, and the fat content of your beef — and the science behind each one is worth understanding.
🧪 The Maillard Reaction: Why Your Burger Tastes Like That
Let us talk about what is actually happening on that griddle surface.
The Maillard Reaction is a non-enzymatic browning process first described by French chemist Louis-Camille Maillard in 1912. In simple terms: when amino acids (the building blocks of protein) and reducing sugars come into contact at high heat — roughly above 280°F / 138°C — they react with each other and produce hundreds of entirely new flavor and aroma compounds that did not exist in the raw ingredient.
This is why browned meat smells different from raw meat. Not just more cooked — fundamentally different. More complex. More savory. More satisfying.
The reaction is surface-level. It only happens where direct dry heat meets the meat. This is critically important. The moment your patty starts trapping steam — whether from a lid, a crowded pan, or moisture pooling beneath the meat — the surface temperature drops below that 280°F threshold and the Maillard Reaction stalls. You get gray. You get steamed. You get the sad burger.
Now here is where the physics matters. The reason we use the heat transfer equation:
Q=mcΔT
…is to understand why surface temperature is everything. Q is the heat transferred, m is the mass, c is the specific heat capacity of the material, and ΔT is the temperature change. Cast iron has a very high thermal mass — meaning it holds and delivers heat consistently even when a cold object (your meat ball) lands on it. A thin stainless pan loses surface temperature the moment cold beef hits it. Cast iron does not flinch. That sustained, uninterrupted heat delivery is what keeps the Maillard Reaction running from second one.
In simple terms: cast iron stays hot so your crust never stops building.
Why We Smash Immediately — Not Later
Protein denaturation begins around 140°F / 60°C. The moment your beef ball touches that 450°F surface, the exterior proteins begin to set and firm up almost instantly. If you wait even 15 seconds before smashing, the structural proteins on the bottom of that ball have already begun to lock in their shape.
Smash too late, and the patty resists — it springs back, stays thick in the center, and you lose that wide, thin, maximally-crusted profile that defines a true smash burger. The smash must happen within the first 3–5 seconds of contact, while the proteins are still mobile and the fat has just begun to render.
🛒 Pro Buying Guide — USA Market Picks
Getting the right ingredients and equipment makes a real difference here. These are the specific things I reach for.
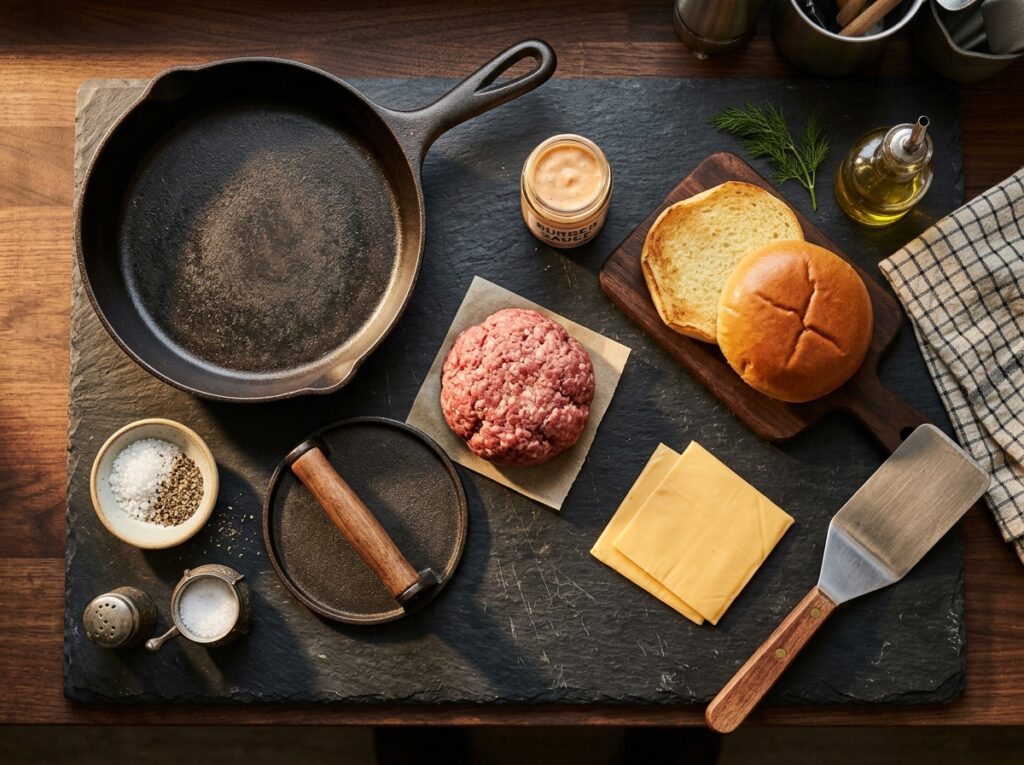
The Beef: Look for 80/20 ground chuck — not ground beef, not ground round. Chuck has the right fat-to-lean ratio for maximum crust formation and moisture retention. At Walmart, the Great Value 80/20 ground chuck is reliably consistent. Whole Foods carries the 365 brand grass-fed 80/20 if you want a cleaner option. Kroger Private Selection blend is another solid pick. Avoid anything leaner than 80/20 — the fat is not optional, it is your flavor carrier.
The Griddle: A Lodge 12-inch cast iron skillet (available at Target, Walmart, and Amazon) is the standard for home smash burgers. If you are ready to invest, the Blackstone 17-inch tabletop griddle gives you restaurant-level surface area and is available at most Walmart Supercenter locations. The Blackstone runs around $100–$130 and is worth every cent if you make burgers regularly.
The Smash Tool: A heavy cast iron or stainless steel burger press is worth having. The Lodge burger press ($15–$20 at Target) works well. In a pinch, a flat-bottomed heavy skillet works too — just wrap the bottom in parchment paper to prevent sticking.
The Buns: Regional preferences matter here. In the American Midwest and South, Martin’s Potato Rolls are the gold standard — soft, slightly sweet, and they absorb beef fat without getting soggy. Available at Kroger and most regional grocery chains. On the coasts, brioche buns from Trader Joe’s or Whole Foods are popular. Toast them butter-side down on the same cast iron surface after your patties come off.
The Cheese: American cheese slices are not a compromise — they are chemically superior for smash burgers. American cheese contains sodium citrate, an emulsifying salt that keeps the cheese proteins smooth and liquid as it melts rather than breaking into a greasy mess. Kraft Deli Deluxe or Land O’Lakes American (available at the deli counter at Kroger and Publix) melt cleaner than any other option.
📋 Ingredients Table
| Ingredient | US Customary | Metric |
|---|---|---|
| Ground chuck (80/20) | 3 oz per patty | 85g per patty |
| Kosher salt | ½ tsp per patty | 2.5g per patty |
| Black pepper, coarse | ¼ tsp per patty | 1g per patty |
| Unsalted butter | 1 tbsp | 14g |
| American cheese slices | 2 per burger | 2 per burger |
| Martin’s Potato Rolls | 1 per burger | 1 per burger |
| Yellow mustard | 1 tsp per patty | 5ml |
| White onion, finely diced | 2 tbsp | 20g |
| Dill pickles | 2–3 slices per burger | 2–3 slices |
| Neutral oil (for griddle) | ½ tsp | 2.5ml |
⚠️ Common Mistakes Table
| The Mistake | What Actually Happens | The Fix |
|---|---|---|
| Smashing too late (after 10+ seconds) | Proteins set, patty resists smash, stays thick, loses crust surface area | Smash within 3–5 seconds of contact — no hesitation |
| Using lean beef (90/10 or leaner) | Not enough fat to render, crust won’t form properly, dry and flavorless | Always use 80/20 ground chuck — fat is essential |
| Low surface temperature | Meat steams instead of searing, Maillard Reaction stalls, gray patty | Preheat cast iron 4–5 minutes on medium-high before cooking |
| Using a lid or covering the pan | Steam builds up, surface moisture spikes, browning stops completely | Never cover — smash burgers need fully open, dry heat |
| Packing the beef too tight | Dense patty doesn’t smash evenly, chewy texture, uneven crust | Loosely form the ball — do not compress before it hits the griddle |
| Moving the patty before the crust releases | Crust tears, patty sticks, you lose the whole golden layer | Wait until the edges show deep brown lacing before flipping |
👨🍳 Step-by-Step Method
Step 1 — Form Your Beef Balls Cold
Take your 80/20 ground chuck straight from the refrigerator. Do not let it warm up. Loosely roll 3 oz / 85g portions into rough balls — think the shape of a golf ball, handled as little as possible. The cold temperature matters because it creates a thermal differential when the meat hits the hot surface, which accelerates crust formation. Season the outside of the ball with a pinch of kosher salt just before cooking — not before, or the salt will begin drawing out moisture.

Step 2 — Preheat Your Cast Iron Properly
Place your Lodge cast iron skillet over medium-high heat for a full 4–5 minutes. Do not rush this. Add a small amount of neutral oil — about half a teaspoon — and let it just begin to shimmer and smoke lightly. You are targeting a surface temperature of 450°F / 232°C. If you have an infrared thermometer (the Etekcity Lasergrip from Amazon, around $15, is what I use), verify the surface temperature before you cook. Do not guess.
Step 3 — The Smash
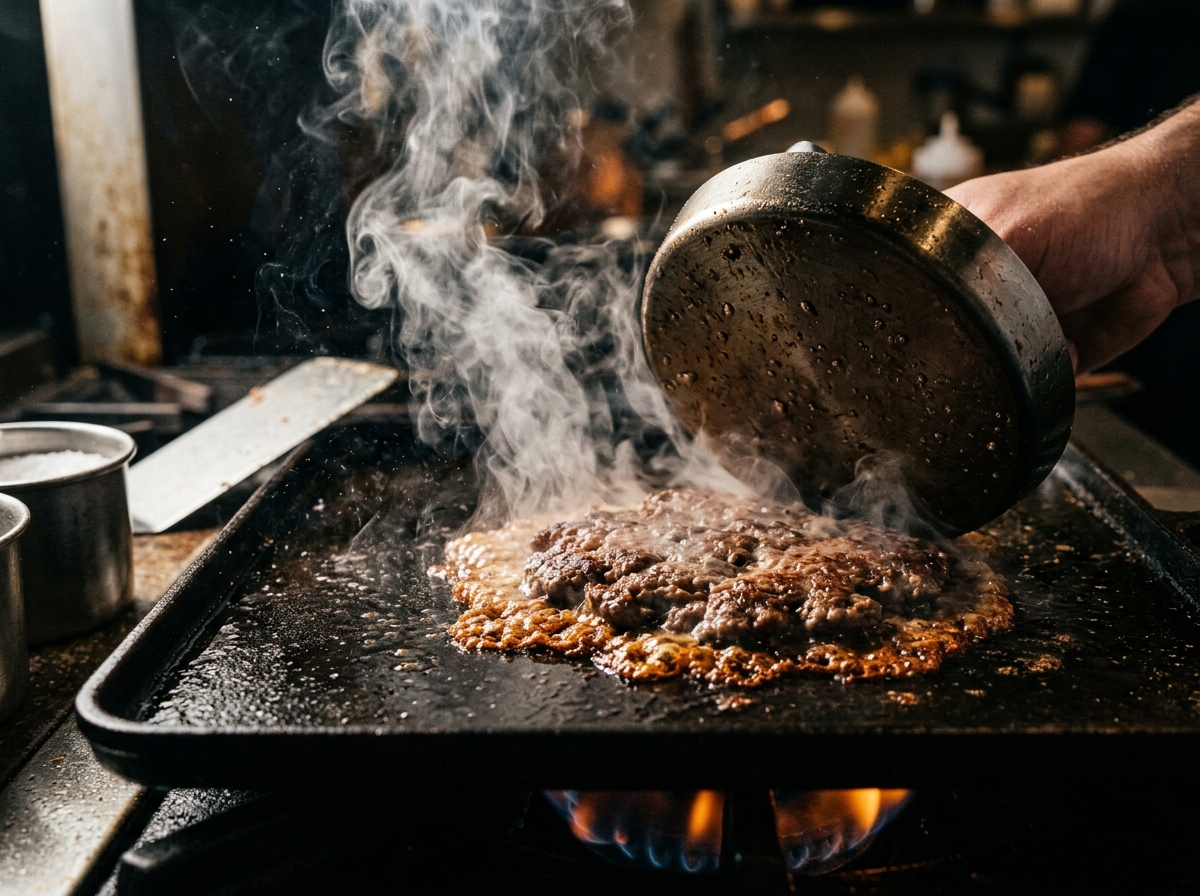
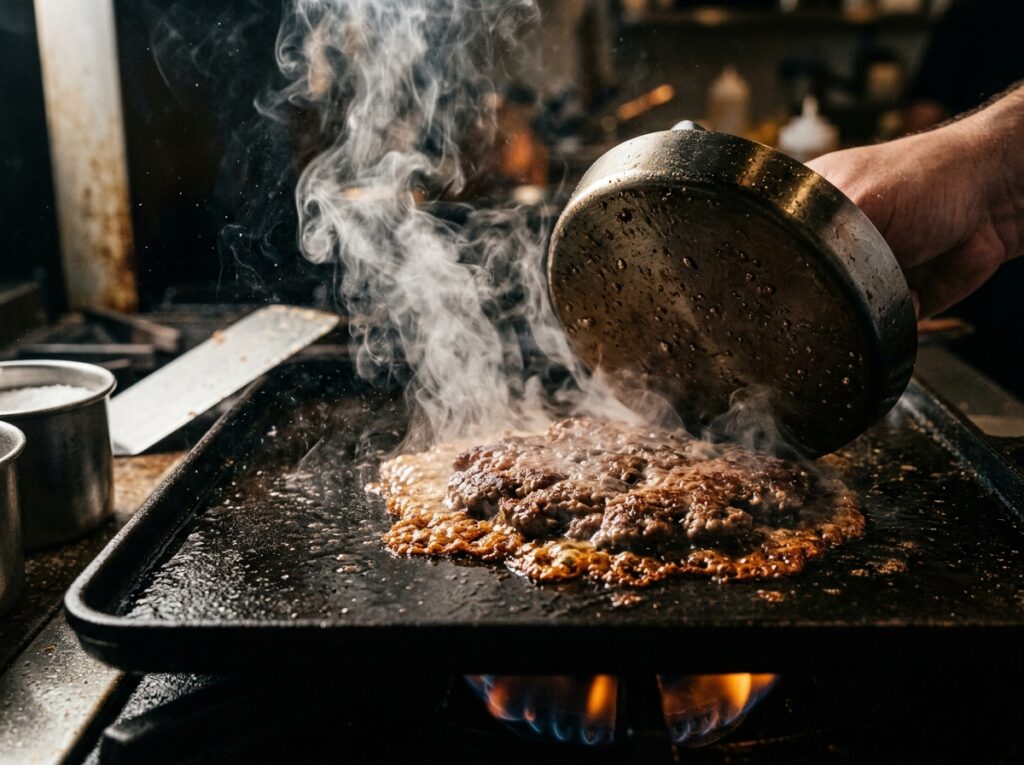
Place your cold beef ball onto the hot surface. Count to three — literally three seconds — and then press down firmly with your burger press or the bottom of a flat heavy pan. Apply steady, even pressure for 10 full seconds. You are targeting a patty about ¼ inch / 6mm thick. The wider and thinner the smash, the more surface area contacts the iron, and the more crust you build. You should hear the fat sizzling aggressively around the edges.
[📸 IMAGE PLACEHOLDER — Action shot: burger press smashing beef onto cast iron, lacy edges forming, smoke rising, dramatic close-angle]
Step 4 — Season and Add Mustard (The Oklahoma Method)
Immediately after smashing, season the top face of the patty with a pinch of coarse black pepper, and if you want to use the Oklahoma Onion Burger technique — press a small handful of finely diced white onion directly onto the raw top surface of the patty. The onion steams into the meat from above while the crust builds below. Some cooks also add a small squeeze of yellow mustard directly onto the onion layer at this point, which caramelizes beautifully.
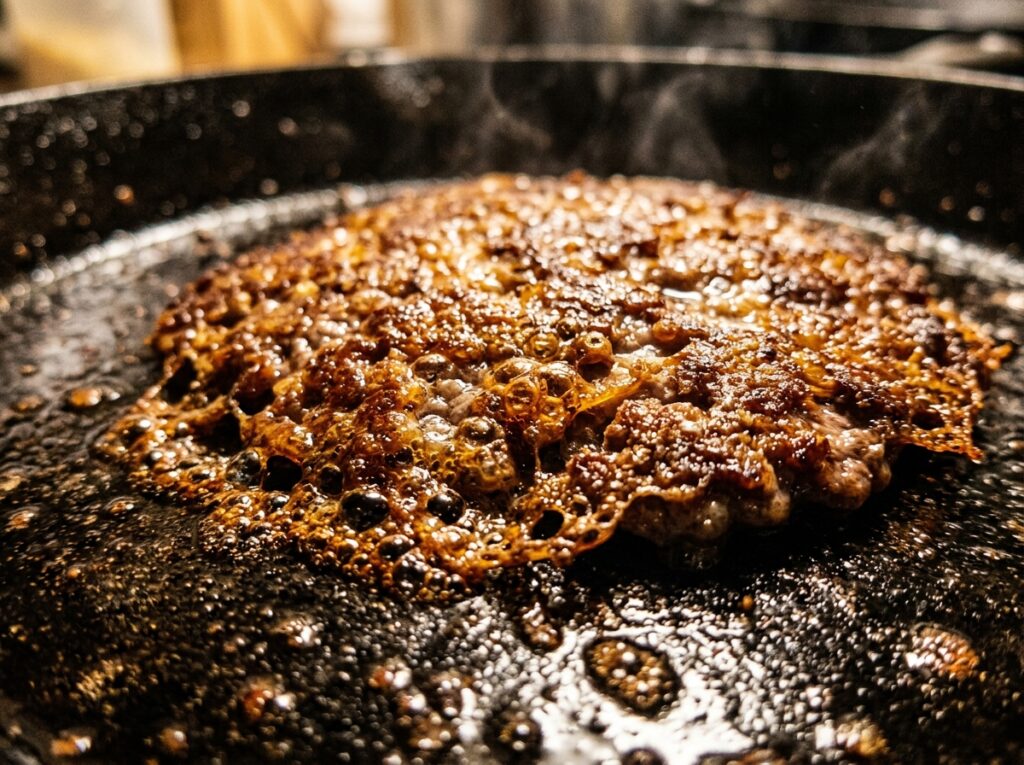
Step 5 — Read the Edges, Then Flip
Do not touch the patty until the edges shift from raw pink to a deep, mahogany-brown lacing. This takes about 1 minute 30 seconds to 2 minutes on a properly preheated surface. Use a thin metal spatula — the Dexter-Russell 3-inch burger spatula is the industry standard and available on Amazon for around $10. Slide it under the patty with a single confident scrape. If it resists, wait 15 more seconds. The crust will release cleanly when it is ready.
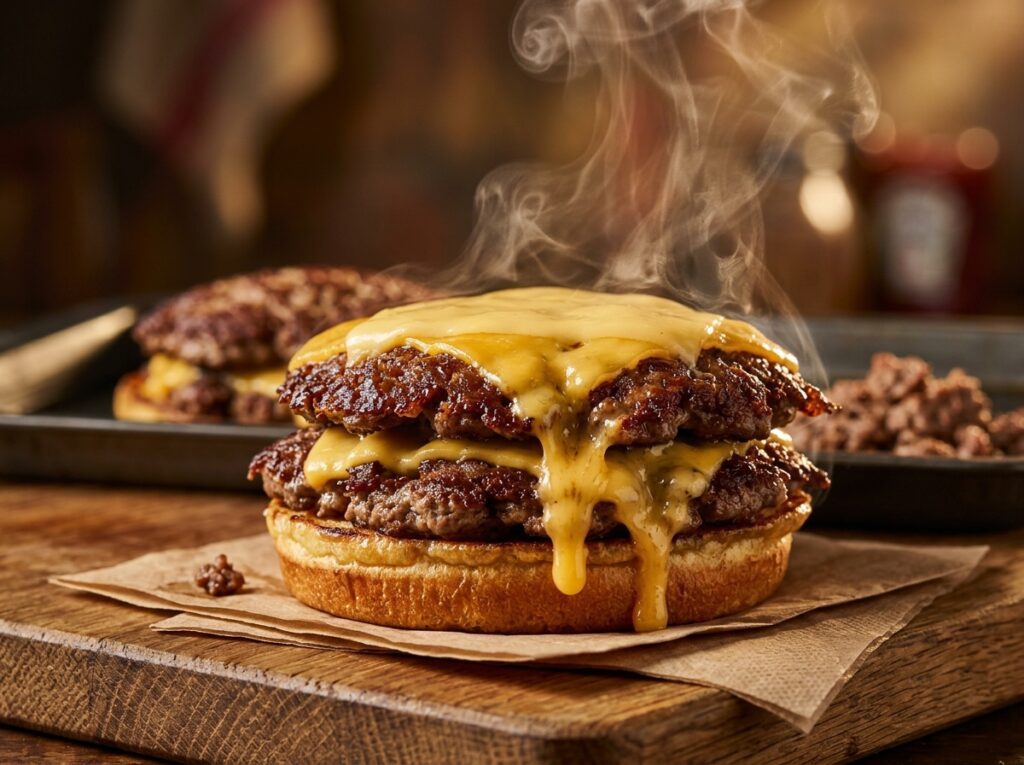
Step 6 — The Cheese Pull Moment
Flip the patty. Immediately place your American cheese slices on top. The residual heat from the cooked side will begin melting the cheese from below while the second side cooks for just 30–45 more seconds. For a double smash burger, stack a second patty directly on top of the first, cheese-to-cheese, and let the combined heat melt everything together into one glorious, unified stack.
Step 4 — Season and Add Mustard (The Oklahoma Method)
Immediately after smashing, season the top face of the patty with a pinch of coarse black pepper, and if you want to use the Oklahoma Onion Burger technique — press a small handful of finely diced white onion directly onto the raw top surface of the patty. The onion steams into the meat from above while the crust builds below. Some cooks also add a small squeeze of yellow mustard directly onto the onion layer at this point, which caramelizes beautifully.
Step 5 — Read the Edges, Then Flip
Do not touch the patty until the edges shift from raw pink to a deep, mahogany-brown lacing. This takes about 1 minute 30 seconds to 2 minutes on a properly preheated surface. Use a thin metal spatula — the Dexter-Russell 3-inch burger spatula is the industry standard and available on Amazon for around $10. Slide it under the patty with a single confident scrape. If it resists, wait 15 more seconds. The crust will release cleanly when it is ready.
Step 6 — The Cheese Pull Moment
Flip the patty. Immediately place your American cheese slices on top. The residual heat from the cooked side will begin melting the cheese from below while the second side cooks for just 30–45 more seconds. For a double smash burger, stack a second patty directly on top of the first, cheese-to-cheese, and let the combined heat melt everything together into one glorious, unified stack.
[📸 IMAGE PLACEHOLDER — Cheese melting over a double smash patty stack, edges lacy gold, steam rising, dramatic warm studio lighting]
Step 7 — Toast the Bun, Build the Burger
Remove the patties. In the same pan, add a small amount of butter and toast your potato rolls cut-side down for 60–90 seconds until golden. Build your burger from the bottom up: bottom bun, sauce (a simple mix of mayo, ketchup, and a dash of Frank’s RedHot), pickles, smash stack, diced onion if you want extra bite, top bun. Serve immediately — smash burgers do not wait well.
[📸 IMAGE PLACEHOLDER — Final beauty shot: assembled smash burger cross-section, two golden patties, melted American cheese pull, toasted potato roll, dill pickles visible, warm dramatic lighting on dark wood surface]
💬 Chef Ahmad’s Insight
The smash burger is one of the most honest things you can cook. There is nowhere to hide. No marinade masking a weak sear. No sauce covering a gray patty. Just beef, heat, and the Maillard Reaction doing exactly what it was always meant to do. What I love most about this technique is how it rewards patience in an impatient moment — that 90-second wait before the flip is the hardest part, and also the most important. Most people flip too early because they are afraid. They disturb the crust before it has built itself. The lesson I keep coming back to, after hundreds of patties, is the same one that applies everywhere in the kitchen: the best results come to those who trust the process and let the heat do its work.
The perfect burger is not made in the smash. It is made in the wait.
— Chef Ahmad | CookDawn
🥗 Nutrition Table
Per single smash burger (double patty, American cheese, potato bun, standard toppings). Values are estimates.
| Nutrient | Per Serving |
|---|---|
| Calories | 680 kcal |
| Protein | 38g |
| Total Fat | 38g |
| Saturated Fat | 16g |
| Carbohydrates | 42g |
| Sodium | 980mg |
| Cholesterol | 125mg |
Nutritional values are estimates and will vary based on specific brands and portion sizes used.
🌡️ Food Safety Temperature Guide
| Stage | Target Temperature | Notes |
|---|---|---|
| Griddle surface (minimum) | 450°F / 232°C | Below this, Maillard Reaction is sluggish |
| Ground beef (USDA minimum) | 160°F / 71°C | USDA requires all ground beef cooked to 160°F |
| Cheese melt point | 130°F / 54°C | American cheese begins flowing at this temp |
| Danger Zone | 40°F–140°F / 4°C–60°C | Never hold cooked patties in this range |
| Bun toasting surface | 325°F / 163°C | Lower than meat — butter burns above 350°F |
Always follow USDA guidelines for ground beef internal temperature. Use an instant-read thermometer for accuracy.
🧊 Storage & Reheating Table
| State | Refrigerator | Freezer | Best Reheat Method |
|---|---|---|---|
| Cooked patties (unsauced) | 3–4 days | Up to 3 months | Cast iron, medium-high, 90 sec per side |
| Assembled burger | Not recommended | Not recommended | Deconstruct before storing |
| Raw beef balls (formed) | 1–2 days | Up to 4 months | Thaw overnight in fridge before cooking |
| Toasted buns | 1 day wrapped | Not recommended | Dry skillet, 30 seconds per side |
❓ FAQ
Can I use a non-stick pan instead of cast iron?
Technically yes, but non-stick surfaces are not designed for temperatures above 400°F / 204°C and will start degrading at the heat you need for a proper smash. The coating can also break down and release compounds you do not want near your food at those temperatures. Stick with cast iron or carbon steel.
Why does my patty shrink into a thick disk even after smashing?
You are either smashing too late (proteins already setting), using beef that is too lean (not enough fat to keep the patty pliable), or your beef balls were packed too tightly before cooking. Loose, cold, 80/20 balls smashed within three seconds give you that wide, thin, maximum-crust result.
Is American cheese really better than cheddar for smash burgers?
For melting performance on a smash burger, yes — American wins. It contains sodium citrate which keeps the melt smooth and fluid. Sharp cheddar breaks and goes greasy. If you want cheddar flavor, use white American blended with a small amount of sharp cheddar, or look for Velveeta Queso Blanco as a hybrid option.
Can I make smash burgers on a Blackstone griddle outdoors?
Absolutely — and honestly, the Blackstone is ideal because you have more surface area and better heat consistency across the whole cooking zone. Preheat for 8–10 minutes on high, then drop to medium-high before cooking. Many competition-level smash burger cooks use a Blackstone exclusively.
What is the best way to make smash burger sauce at home?
The standard ratio I use: ¼ cup mayo, 2 tbsp ketchup, 1 tbsp yellow mustard, 1 tsp Frank’s RedHot, 1 tsp sweet pickle relish, ½ tsp garlic powder. Mix and refrigerate for at least 30 minutes before serving. The rest time lets the flavors actually combine rather than sitting on top of each other.
Leave a Reply